
outFARMING
2021 Farming
Planter Monitor
Liquid Fertilizer Monitor
Soil Testing
Meter Testing
Remote Sensors & Controllers
Contact Me
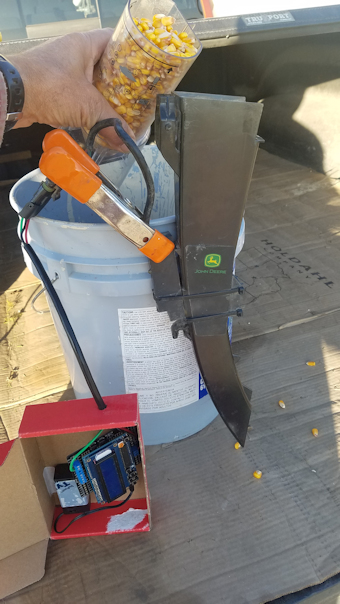
Fall 2019: I built this device to count kernels to use with my yield calculator. I could have counted kernels in each sample by hand but I had these parts and it seemed like a good project. You can buy the electronic parts needed from www.adafruit.com. I used a genuine Arduino Uno R-3 but the Adafruit Metro is compatible with it. I used a spare seed tube with a high speed sensor. One could pull one off your planter for the fall. With a high speed sensor you can drop 5 - 10 kernels through at once and it can count them all! The cable was hand built so the weatherpack connector would hook to the seed sensor.
 Get kernels/ear avg Pioneer app or count the kernels via rows around X kernels long
|
 GAC Moisture Tester
 |
 Count kernels in sample
|
 Weigh sample with scale
|
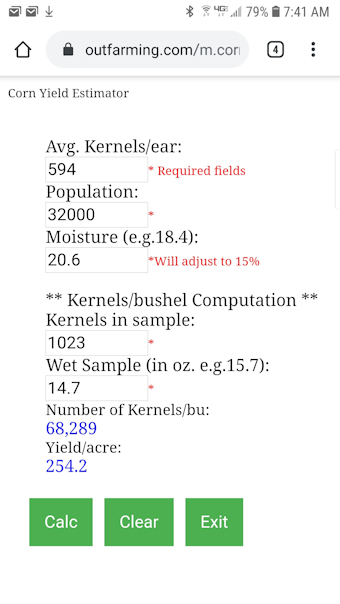 My Corn Yield App
|
 |
 I built this thing on a Sunday morning before church and I needed a box. Press
the Select button to reset the counter to 0. I built this thing on a Sunday morning before church and I needed a box. Press
the Select button to reset the counter to 0. |
 |
 |
Parts List (As of October 2019):

|

|

|

|
Here's my Arduino code:
/*********************
www.outFarming.com
by James Poyzer
**********************/
// include the library code:
#include <Wire.h>
#include <Adafruit_RGBLCDShield.h>
#include <utility/Adafruit_MCP23017.h>
// The shield uses the I2C SCL and SDA pins. On classic Arduinos
// this is Analog 4 and 5 so you can't use those for analogRead() anymore
// However, you can connect other I2C sensors to the I2C bus and share
// the I2C bus.
Adafruit_RGBLCDShield lcd = Adafruit_RGBLCDShield();
// These #defines make it easy to set the backlight color
#define RED 0x1
#define YELLOW 0x3
#define GREEN 0x2
#define TEAL 0x6
#define BLUE 0x4
#define VIOLET 0x5
#define WHITE 0x7
// Encoder output to Arduino Interrupt pin
#define SensorPin 2
// Pulse count from encoder
volatile long encoderValue = 0;
// One-second interval for measurements (5 sec)
int interval = 1000;
// Counters for milliseconds during interval
long previousMillis = 0;
long currentMillis = 0;
long debounceDelay = 500; // the debounce time int reading = 0;
int lastSensorState = 0;
unsigned long lastDebounceTime = 0;
void setup() {
// set up the LCD's number of columns and rows:
lcd.begin(16, 2);
// Set encoder as input with internal pullup
pinMode(SensorPin, INPUT_PULLUP);
// Attach interrupt
attachInterrupt(digitalPinToInterrupt(SensorPin), updateEncoder, RISING);
// Print a message to the LCD. We track how long it takes since
// this library has been optimized a bit and we're proud of it :)
int time = millis();
lcd.print("OutFarming.com");
time = millis() - time;
Serial.print("Took "); Serial.print(time); Serial.println(" ms");
lcd.setBacklight(WHITE);
uint8_t i = 0;
lcd.setBacklight(RED);
}
void loop() {
// Update Count value every second
currentMillis = millis();
if (currentMillis - previousMillis > interval) {
previousMillis = currentMillis;
// Only update display when there is a reading
if (encoderValue > 0) {
Serial.print("Seed Count: ");
Serial.println(encoderValue);
}
// set the cursor to column 0, line 1
// (note: line 1 is the second row, since counting begins with 0):
lcd.clear();
lcd.setCursor(0, 0);
lcd.print("OutFarming.com");
lcd.setCursor(0, 1);
lcd.print("Count:");
lcd.setCursor(8, 1);
lcd.print(encoderValue);
}
uint8_t buttons = lcd.readButtons();
if (buttons) {
lcd.clear();
lcd.setCursor(0, 0);
if (buttons & BUTTON_SELECT) {
encoderValue = 0;
lcd.setCursor(0, 1);
lcd.print("Count zeroed");
delay(1000);
lcd.clear();
}
}
}
void updateEncoder()
{
// Increment value for each pulse from encoder
encoderValue++;
}